Building an outdoor gas firepit is a great way to enhance your outdoor space and create a cozy gathering spot. With the right materials and a step-by-step guide, you can easily build your own firepit right in your backyard. In this article, we will provide you with easy-to-follow instructions on how to make an outdoor gas firepit at home.
Key Takeaways:
- Creating an outdoor gas firepit can transform your backyard into a cozy gathering space.
- Ensure you have all the necessary materials and tools before starting the project.
- Follow safety guidelines when working with gas and propane.
- Construct the firepit frame using 2x4s and plywood, following accurate measurements.
- Add a visually appealing design by attaching slats made from western red cedar boards.
Gathering the Materials and Tools
Before you can start building your outdoor gas firepit, you need to gather all the necessary materials and tools. Here’s a list of what you’ll need:
Materials:
- Wood: Choose a type of wood that is suitable for outdoor use and can withstand exposure to the elements.
- Wood Glue: Use wood glue to securely bond the pieces of wood together.
- Saw: A saw will be needed to cut the wood to the desired size and shape.
- Nails: Nails will be used to connect the pieces of wood together.
- Brad Nailer: A brad nailer can be used for faster and more efficient nailing.
- Wood Finish: Apply a wood finish to protect the wood from moisture and UV damage.
- Casters: If you want your firepit to be mobile, you’ll need casters to attach to the bottom.
- Fire Pit Plans: Use pre-made fire pit plans or create your own design.
- Propane Tank: You’ll need a propane tank to fuel your gas firepit.
- Fire Tray: The fire tray will hold the propane and distribute the flames evenly.
Tools:
- Measuring Tape: Use a measuring tape to ensure accurate measurements.
- Level: A level will help you ensure that your firepit is properly aligned and balanced.
- Screwdriver: A screwdriver will be needed to tighten screws and bolts.
- Drill: A drill can be used to create pilot holes for screws.
- Clamps: Clamps can hold pieces of wood together while the glue dries.
- Safety Gear: Wear safety goggles and gloves to protect yourself during the construction process.
Once you have all the materials and tools ready, you can move on to the next step of building your outdoor gas firepit.
Building the Fire Pit Frame
The construction of the fire pit frame is a crucial step in building your outdoor gas firepit. To start, gather 2x4s and use them to create a sturdy box that will house the propane tank. Make sure to use exterior-rated wood glue and screws to securely assemble the frame. It’s essential to follow a set of plans to ensure accurate measurements and a sturdy structure.
Once the frame is built, you can attach plywood to create the body of the firepit. Cut the plywood according to the dimensions specified in your plans and use screws to fix it securely to the frame. This will give your firepit a solid foundation to support the weight of the fire tray and the rest of the structure.
Choosing the Right Materials
When building the fire pit frame, it’s important to choose materials that are durable and weather-resistant. Opt for pressure-treated or cedar wood to ensure longevity and resistance against rotting or warping. Additionally, seal all exposed wood surfaces with an exterior wood finish to protect them from the elements.
Remember to consider the safety aspect as well. Ensure that the frame is secure and stable, as it will support the weight of the firepit and the propane tank. Following proper construction techniques and guidelines will help you create a well-built and safe firepit frame.
Ensuring Proper Ventilation
During the construction of the fire pit frame, it’s crucial to incorporate proper ventilation to ensure the safe operation of the gas firepit. This can be achieved by drilling strategic holes in the bottom of the frame to allow for the circulation of air and the release of gas. Adequate ventilation will prevent the buildup of gas and reduce the risk of a fire hazard.
By carefully constructing the fire pit frame and considering the materials, safety, and ventilation, you can create a solid foundation for your outdoor gas firepit. This will ensure that your firepit is both functional and safe for enjoyable gatherings in your outdoor space.
Adding the Top and Slat Design
Once the body of the firepit is constructed, it’s time to move on to the next step: adding the top and slat design. This is where you can really start to see your firepit taking shape and becoming a visually appealing addition to your outdoor space.
To begin, you’ll need to frame out the top of the firepit using the same materials you used for the body. This will create a sturdy base for the slats to be attached to. Secure the top to the body using screws, making sure it is level and secure.
Now it’s time to add the slats that will give your firepit that extra touch of style and design. Western red cedar boards work well for this, as they are durable and naturally resistant to decay. Cut the slats to size and miter them to achieve a waterfall effect, creating a visually appealing design.
Secure the ends of the slats to the frame using exterior wood glue and brad nails. This will ensure that the slats are securely in place and won’t shift or move over time.

Creating a Beautiful Focal Point
The addition of the top and slat design not only adds visual interest to your firepit, but it also creates a beautiful focal point in your outdoor space. The waterfall effect of the slats adds a unique touch that will impress your guests and make your firepit stand out.
When choosing the finish for your firepit, consider using a stain or sealant that will enhance the natural beauty of the wood. This will not only protect the wood from the elements, but it will also add a polished and finished look to your firepit.
Now that you have added the top and slat design, your firepit is almost complete. The next and final step is to apply the finish and add any final touches that will make your firepit truly one-of-a-kind.
Applying the Finish and Final Touches
Now that the structure of your outdoor gas firepit is complete, it’s time to add the finishing touches to make it truly stunning. First, you’ll want to apply a protective finish to the slats and body of the firepit. Choose a wood finish that is specifically designed for exterior use and offers UV protection to ensure that your firepit stands the test of time. Apply the finish according to the manufacturer’s instructions, making sure to cover all surfaces evenly.
Next, it’s important to seal any gaps or openings in the firepit to maintain gas firepit safety. Use construction adhesive to seal off any areas where gas could potentially escape. This will not only prevent gas leaks but also help to keep your firepit functioning at its best.
Adding Personal Touches
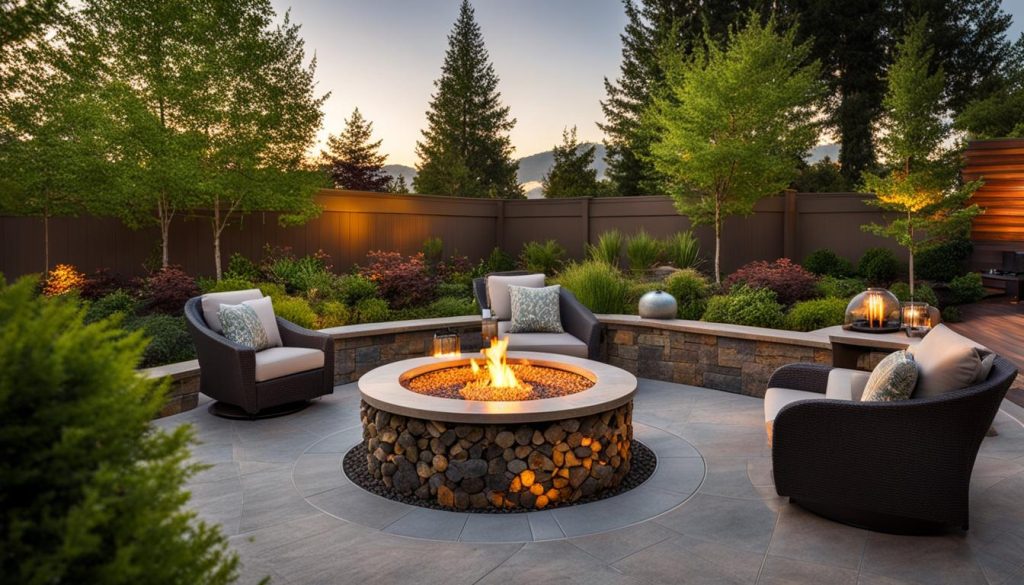
To make your outdoor firepit more inviting and comfortable, consider adding some decorative elements. You can fill the firepit with rocks to create a natural and rustic look. Additionally, you may want to add some seating options such as chairs or benches around the firepit, along with a table for drinks and snacks. These extra touches will transform your firepit into a cozy gathering spot for friends and family.

With the finish applied and the final touches in place, your outdoor gas firepit is now ready to be enjoyed. Gather around the warm glow of the fire, roast marshmallows, and create unforgettable memories with your loved ones. Remember to practice firepit safety at all times and never leave a fire unattended. Now, sit back, relax, and enjoy the beauty and warmth of your DIY outdoor gas firepit.
Conclusion
Congratulations on completing your outdoor gas firepit! By following these easy steps and using the right materials and tools, you have successfully built a beautiful and functional firepit in your backyard.
DIY gas firepits are a fantastic way to enhance your outdoor space and create a cozy gathering spot for friends and family. The design possibilities are endless, allowing you to customize your firepit to match your personal style and outdoor decor.
Remember, safety should always be a top priority when it comes to gas firepit installation. Be sure to follow all the necessary precautions and consult a professional if you have any concerns or questions.
Now that your firepit is complete, it’s time to grab some chairs, gather around the warmth and ambiance, and enjoy unforgettable nights by your very own outdoor gas firepit.
FAQ
What materials and tools do I need to build an outdoor gas firepit?
You will need items such as wood, wood glue, a saw, nails, a brad nailer, wood finish, casters, fire pit plans, a propane tank, and a fire tray.
How do I construct the frame for the firepit?
Use 2x4s to create a box that will house the propane tank. Use wood glue and screws to securely assemble the frame.
What is the next step after constructing the frame?
After constructing the frame, you need to attach plywood to create the body of the firepit. Then, frame out the top and attach it to the body using screws.
Can I add a visually appealing design to the firepit?
Yes, you can add slats made from western red cedar boards to create a visually appealing design. The slats can be cut and mitered to achieve a waterfall effect.
How do I apply a finish and add final touches?
Coat the slats and body with a wood finish suitable for exterior use and offering UV protection. Seal any gaps or openings with construction adhesive. Fill the firepit with rocks and add accessories such as chairs and a table.
What should I prioritize when working with gas and propane?
Always prioritize safety when working with gas and propane, and consult a professional if you are unsure about any aspect of the installation process.
Is building my own outdoor gas firepit a rewarding project?
Yes, building your own outdoor gas firepit can be a rewarding and enjoyable project that allows you to create a beautiful and functional firepit right in your backyard.
